此文是从之前做的red5知识分享PPT中摘取,内容比较简单粗略。当时在讯飞做爱吼网流媒体服务smp,对red5有点了解。
Red5中AMF格式解析
AMF0数据类型及标志位
- Number - 0x00 (Encoded as IEEE 64-bit double-precision floating point number)
- Boolean - 0x01 (Encoded as a single byte of value 0x00 or 0x01)
- Object - 0x03 (Set of key/value pairs)
- Null - 0x05
- ECMA Array - 0x08 (32-bit entry count)
- Object End - 0x09 (preceded by a empty 16-bit string length)
- Strict Array - 0x0a (32-bit entry count)
- Date - 0x0b (Encoded as IEEE 64-bit double-precision floating point number with 16-bit integer timezone offset)
- Long String - 0x0c (32-bit integer string length with UTF-8 string)
- XML Document - 0xf0 (32-bit integer string length with UTF-8 string)
- Typed Object - 0x10 (16-bit integer name length with UTF-8 name, followed by entries)
- Switch to AMF3 - 0x11
AMF3数据类型及标志位
- Undefined - 0x00
- Null - 0x01
- Boolean False - 0x02
- Boolean True - 0x03
- Integer - 0x04 (expandable 8+ bit integer)
- Double - 0x05 (Encoded as IEEE 64-bit double-precision floating point number)
- String - 0x06 (expandable 8+ bit integer string length with a UTF-8 string)
- XML - 0x07 (expandable 8+ bit integer string length and/or flags with a UTF-8 string)
- Date - 0x08 (expandable 8+ bit integer flags with a IEEE 64-bit double-precision floating point UTC offset time)
- Array - 0x09 (expandable 8+ bit integer entry count and/or flags with optional expandable 8+ bit integer name lengths with a UTF-8 names)
- Object - 0x0A (expandable 8+ bit integer entry count and/or flags with optional expandable 8+ - bit integer name lengths with a UTF-8 names)
- XML End - 0x0B (expandable 8+ bit integer flags)
- ByteArray - 0x0C (expandable 8+ bit integer flags with optional 8 bit byte length)
Red5中AMF格式解析实现
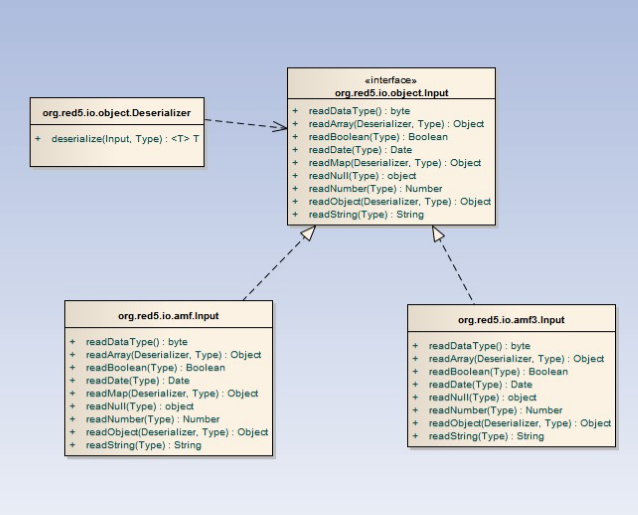
Example解析AMF数据
1
2
3
4
5
6
IoBuffer buffer = IoBuffer.wrap(bytes); //bytes 为AMF0格式byte数组
Input input = new org.red5.io.amf.Input(buffer);
Deserializer deserializer = new Deserializer();
String str = deserializer.deserialize(input, String.class);
Object object = deserializer.deserialize(input, Object .class);
…构造AMF数据
1
2
3
4
String str = “test”;
Output output = new org.red5.io.amf.Output(buffer);
Serializer serializer = new Serializer();
serializer.serialize(output, str);
Red5解析RTMP消息包
背景知识
Mina框架核心部分框架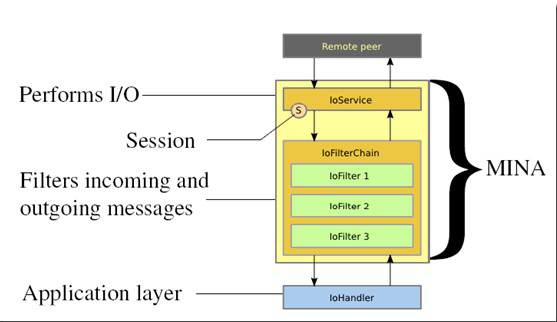
Mina中由Filter过滤器处理来自网络数据包,然后转交给应用层的IoHandler做具体的业务处理RMTP消息包解析
RTMPMinaProtocolDecoder接收来自Mina的数据,真正做数据解析是由RTMPProtocolDecoder类来完成RTMP数据包header和body的解析工作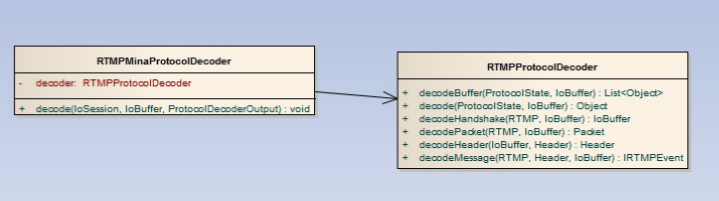
- Header解析
RTMP包头结构
包头有4种长度:12, 8, 4, 1 byte(s).
完整的12字节RTMP包头每个字节的含义:
| 用途 | 大小(Byte) | 含义 |
|---|---|---|
| Head_Type | 1 | 包头 |
| TiMMER | 3 | 时间戳 |
| AMFSize | 3 | 数据大小 |
| AMFType | 1 | 数据类型 |
| StreamID | 4 | 流ID |
完整的RTMP包头是12bytes,
包含时间戳 ,AMFSize, AMFType,StreamID信息,
8字节的包头只纪录 了时间戳,AMFSize,AMFType,
其他字节的包头纪录信息依次类推
Red5如何将8,4, 1 字节的不完整包头构造成完整的Header消息?
详见:1
2
3
4
5
6
7在RTMPMinaProtocolDecoder.decode(IoSession session, IoBuffer in, ProtocolDecoderOutput out)方法中
// get our state
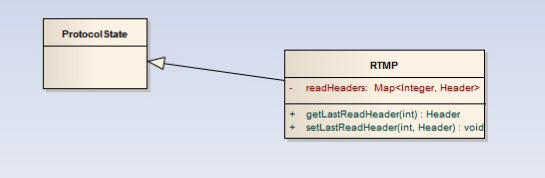
final ProtocolState state = (ProtocolState)
session.getAttribute(ProtocolState.SESSION_KEY);
在RTMPProtocolDecoder. decode(ProtocolState state, IoBuffer in)方法中
final RTMP rtmp = (RTMP) state;
Red5通过在IoSession中维护Header消息的map,通过获取上一个header来将缺失的包头信息补齐,具体代码见
RTMPProtocolDecoder. decodeHeader(IoBuffer in, Header lastHeader)方法
Body解析
Rtmp包默认的最大长度为128字节,(或通过chunksize改变rtmp包最大
长度), 当AMF数据超过128Byte的时候就可能有多个rtmp包组成,如果需
要解码的rtmp包太长则被TCP协议分割成多个TCP包.那么解码的时候需要
先将包含rtmp包的tcp封包合并, 再把合并的数据解码,解码后可得到amf
格式的数据,将这些AMF数据取出来就可以对AMF数据解码Red5在RTMP中像维护header一样维护一份packet的map信息,除此之外还有维护当前的解码状态。Body的解析首先要从header中得到一个完整packet消息的大小,根据当前的接受到的字节大小还有chunksize来判断是否收到一个完整的packet消息的字节,然后再进行body解析与header形成一个业务类,最后转发到RTMPMinaIoHandler做业务处理。
具体代码见RTMPPotocolDecoder.decodePacket(RTMP rtmp, IoBuffer in)方法和decodeMessage(RTMP rtmp, Header header, IoBuffer in)方法


